
How to Fix Dropped Stitches in Lace Knitting
Publicado el Oct 17, 2026
By Editorial Team
Ahorra un 15% en toda la tienda desde ahora hasta el 31 de diciembre de 2025

Last Updated: October 17, 2026
Dropped stitches in lace knitting are loops that slip off the needles, leaving a gap that can unravel downward through multiple rows if left unrepaired.
Understanding why lace stitches drop helps prevent future problems. Lace requires precision: yarn overs create new loops and decreases remove stitches strategically, so a missed yarn over, a stitch sliding off a needle tip, or inconsistent tension breaks the pattern's balance.
Lace patterns demand more attention than stockinette or garter stitch. The structure of lace relies on negative space, the holes created by yarn overs, combined with solid stitches. This contrast means dropped stitches show immediately and unravel faster.
Several factors make lace especially prone to drops:
Lace knitting rewards slow, deliberate work. Rushing through rows is where most drops happen.
Catching a dropped stitch early saves hours of repair work. Most knitters can spot drops within a few rows by checking stitch count and looking for unexpected holes.
Read your lace stitches as you work:
Comparing your work to the pattern chart helps spot drops before they travel far. If a stitch is missing from where a solid column should be, mark and repair it immediately.
Lifelines are lengths of contrasting yarn threaded through a complete row of stitches, acting as an anchor point. If something goes wrong, the knitter can rip back to the lifeline row instead of losing multiple rows of work.
For lace knitting, lifelines are insurance: they let a knitter fix dropped stitches without fear of losing hours of progress.
Lifelines work best when placed strategically. Insert them at natural breaking points in your pattern:
Frequency depends on pattern complexity and yarn weight: delicate lace on thin yarn benefits from more lifelines, while simpler patterns can space them further apart.
A lifeline transforms a potential disaster into a minor setback. Without one, a dropped stitch several rows back means frogging entire rows to find and fix the problem; with one, the knitter knows exactly where to stop.
When a dropped stitch is discovered:
This takes 10-20 minutes instead of the hour or more required to rip back blindly and recount stitches.
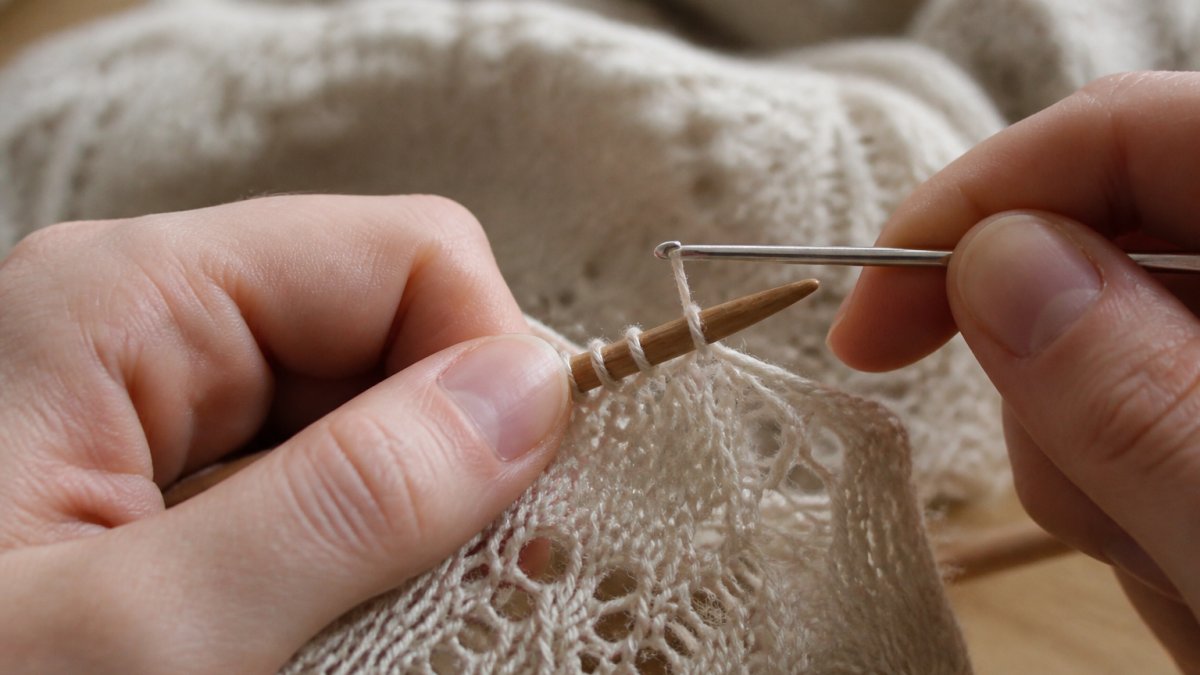
How to fix dropped stitches in lace knitting starts with the right tool and a clear process. A crochet hook is the standard repair tool because it catches loose yarn and pulls it through the dropped stitch cleanly.
Gather these items before starting:
Hook size matters: too large catches multiple yarn strands, too small makes pulling yarn difficult.
Step 1: Locate the dropped stitch
Step 2: Insert the crochet hook
Push the crochet hook through the dropped stitch from front to back.
Step 3: Pull the yarn through
Pull the yarn gently through the dropped stitch. This recreates the stitch one row up.
Step 4: Repeat for each row
Step 5: Place the stitch back on the needle
Once the stitch is at the correct row, slip it from the crochet hook back onto the knitting needle.
Step 6: Check tension
Tighten the stitches around the repair. The repaired stitch should match the tension of surrounding stitches.
When a dropped stitch goes unnoticed for several rows, the repair becomes more complex. Multiple rows of yarn hang loose, and the stitch structure may be distorted.
Look at the column where the stitch dropped and count the rows between the current working row and where the stitch left the needles; that tells you how many rows of yarn need to be pulled through.
Dropped stitches create a visible ladder of loose yarn. Follow that ladder from top to bottom. The bottom loop is where the stitch originally dropped.
Step 1: Insert the crochet hook through the bottom loop
Start at the lowest point of the dropped stitch.
Step 2: Catch the next strand of yarn
Pull the yarn that hangs directly above the dropped stitch through the loop on the hook.
The Complete Guide to Lace Knitting: Your lace knitting master class - Paperback →
Step 3: Move the hook up one row
Insert the hook through the new stitch created in step 2. Catch the next strand of yarn hanging above.
Step 4: Repeat until reaching the working row
Step 5: Place the final stitch on the needle
Slip the completed stitch from the hook onto the working needle. The repair is now complete.
Yarn overs are intentional loops created by wrapping yarn around the needle. When a yarn over drops, the repair differs from a standard stitch because the structure needs to be recreated exactly.
A yarn over is not a regular stitch but a deliberate hole in the fabric. When it drops, surrounding stitches may have shifted, so the repair must restore the open structure rather than just pull yarn through.
Dropped yarn overs cause the most visible damage because they break the intended pattern of holes and solid stitches.
Step 1: Identify the yarn over position
Check the pattern chart to confirm this stitch should be a yarn over.
Step 2: Insert the crochet hook
Step 3: Pull yarn through carefully
Pull the yarn through gently. The yarn over should create an open loop, not a tight stitch.
Step 4: Ensure the loop sits correctly
Once the yarn over is restored, check that it creates the intended hole.
Step 5: Maintain pattern continuity
Look at the stitches surrounding the repaired yarn over. They should align with the pattern chart.
Yarn overs require more precision than regular stitch repair, so take time to restore the intended structure.
Prevention is always easier than repair. Most dropped stitches result from tension problems, needle choice, or stitch formation issues.
Consistent tension prevents dropped stitches. Tension problems come from several sources:
Many knitters hold tension in their shoulders and hands. Dropping the shoulders and shaking out hands between rows reduces fatigue and improves stitch consistency.
Lace knitting rewards slow, mindful work. Rushing through rows is where tension becomes erratic and stitches drop.
Needle and yarn selection affects dropped stitch frequency. Smooth, sharp needles hold stitches more securely than dull ones, and bamboo grips yarn better than slippery metal.
Yarn fiber also matters. Smooth, slippery fibers like silk or rayon drop stitches more easily than grippy fibers.
Needle size should match the yarn weight. Too-large needles create loose stitches that slip easily. Too-small needles create tension problems that lead to dropped stitches as the knitter compensates.
Dropped stitches in lace knitting are fixable, but prevention and quick response make the difference between a minor issue and a major setback.
For knitters ready to deepen their lace knowledge, The Complete Guide to Lace Knitting covers everything from stitch fundamentals to fixing mistakes provides comprehensive instruction on lace techniques, blocking, and pattern design.

Many knitters find that understanding why stitches drop transforms their entire approach to lace.
Lace knitting rewards practice and attention. Each project teaches something new about tension, stitch formation, and the relationship between pattern and fabric.
Dropped stitches in lace knitting are common, but they don't have to derail progress.
Yes. A crochet hook lets you pick up the dropped stitch directly without unraveling. Catch the loose loop with the hook and pull it back through the stitch below, working your way up row by row. This method preserves the rest of your work and saves hours of frogging. The Complete Guide to Lace Knitting covers this technique in detail, with step-by-step instructions for both single drops and multi-row descents.
Look at the direction of your working yarn and the stitch pattern. In lace, yarn overs create holes that lean left or right depending on how they were formed. Pull your dropped stitch through the correct direction to match the pattern's original structure. If unsure, check your lace chart or pattern notes, they show the intended stitch orientation. Using lifelines for lace knitting prevents this confusion by marking safe rows you can reference.
Use the ladder technique: work your way up from the bottom, using a crochet hook to catch each horizontal strand of yarn and pull it through the stitch above. This reconstructs the stitch column row by row. For lace patterns, take extra care to restore yarn overs in the correct direction. If the stitch has run too far to safely repair, consider using a lifeline to secure the surrounding stitches before attempting the fix.
Yarn overs in lace create the decorative holes, so restoring them correctly matters. Use a crochet hook to pull the dropped yarn over through the stitch below, ensuring the loop sits on top of the needle with the yarn open and untwisted. The hole should be clearly visible once repaired. If the yarn over was part of a decrease pair, restore both stitches together to maintain the pattern's structure and balance.

0 comentarios