Knitting gauge for socks is the foundation of a properly fitting sock.
Many knitters skip the gauge swatch and jump straight to casting on. A sock one size too large feels loose; one too tight restricts blood flow.
Gauge also affects durability: tighter gauge creates denser fabric that resists heel and toe wear, while looser gauge pills and develops holes faster.
Creating a Sock Knitting Gauge Swatch
A gauge swatch for socks must be knitted in the same stitch pattern, yarn, and needles you plan to use. Substituting materials gives false measurements.
Choosing yarn and needles for your swatch
Swatch with the exact yarn you'll use. Yarn weight, fiber content, and twist all affect how stitches behave, so a substitute creates gauge mismatch later.
Needles matter just as much: size, material, and tip sharpness all influence stitch size. If your pattern calls for US 1 needles, swatch on US 1 needles.
For sock yarn, most knitters choose needles between US 0 and US 3, depending on the yarn weight and desired fabric density. Brae & Heather carries specialized needles designed for small-circumference knitting, including Addi FlexiFlips and Aluminum Double Points, both of which work well for gauge swatching.
Addi FlexiFlips
Aluminum Double Points
Casting on and knitting your swatch
Cast on at least 24 stitches. A larger swatch gives more accurate measurements and lets you count from the center, avoiding edge distortion.
Knit in stockinette (or your sock's stitch pattern) until the swatch measures at least 4 inches wide and tall; 6-inch squares give more reliable data.
Don't bind off yet. Leave the swatch on the needles or thread the stitches onto scrap yarn; you'll measure and block it first.
How to Measure Knitting Gauge in the Round
Measuring gauge in the round differs from measuring flat swatches. Socks are worked on circular needles, double-pointed needles, or via magic loop, and tube fabric behaves differently than flat fabric, and differently again once relaxed off the needles. Most gauge errors come from measuring stretched fabric, not miscounting.
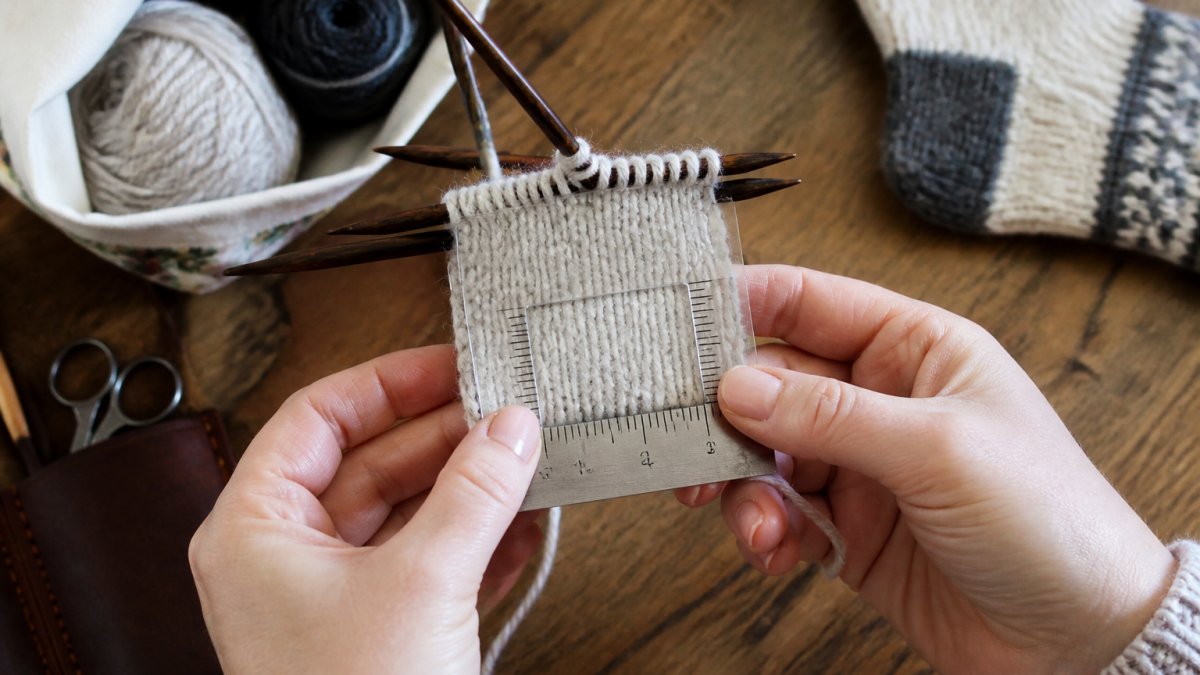
Hands using a ruler and gauge window to measure stitches on a stockinette sock swatch without stretching the fabric.
Why in-the-round gauge differs from flat gauge
When you knit flat, you alternate knit and purl rows, and many knitters purl at a different tension than they knit.
To swatch in the round without knitting an entire tube, use one of these methods:
The tube method: Cast on your swatch stitches, join in the round, and knit a tube at least 4 inches tall. Cut it open along one column of stitches to lay it flat for measuring. This is the most accurate method.
The stranded-float method: Knit a flat swatch, but carry a contrast-color strand loosely across the back of every row. The floats mimic in-the-round tension and prevent edge stitches from pulling in. Cut the floats before measuring.
The back-and-forth-in-the-round method: Knit every row, then slide the work back to the other end of the needle instead of turning. This produces a flat piece of all-knit fabric, though the edges will be looser than a true tube.
Whichever method you use, swatch in the stitch pattern your sock actually uses. Stockinette, 2x2 ribbing, cables, and stranded colorwork all pull in by different amounts, and a stockinette gauge will not predict the circumference of a cabled sock.
Let the swatch rest before you measure
This is the step most knitters skip, and the one that most often causes a wrong-sized sock.
Freshly knitted fabric is under tension from the needles and your hands, so measuring immediately means measuring stretched fabric. Sock yarn, especially springy wool, contracts once it relaxes: a swatch reading 6 stitches per inch off the needles may read 6.5 or 7 after resting.
Do this instead:
Slide the swatch off the needles onto scrap yarn or a holder, or bind off loosely. Do not leave it stretched on the needle.
Lay it flat, without pinning or stretching, and let it rest for at least 30 minutes, an hour is better.
If you plan to wash the finished socks, wash and dry the swatch the same way before measuring.
Measure without stretching the fabric
Stretchy sock fabric distorts easily, so a light touch is essential.
Lay the swatch on a flat, hard surface; fabric on a soft surface like a bed or your lap will sag and give a false reading.
Place a rigid ruler or a gauge window (a plastic square with a 2-inch or 4-inch cutout) on the fabric without pressing down hard.
Count stitches across the center of the swatch, not at the edges, which are distorted by turning, joining, or the float method.
Stitches per inch versus stitches per 4 inches
Both conventions appear in patterns, and mixing them up is a common error.
Stitches per inch: Divide your stitch count by the number of inches you measured. If you counted 26 stitches across 4 inches, your gauge is 6.5 stitches per inch.
Stitches per 4 inches: This is the raw count. The same swatch reads "26 stitches = 4 inches."
Most sock patterns state gauge as stitches per inch or stitches per 4 inches over stockinette in the round. Read the pattern's gauge statement carefully before comparing your numbers.
Row gauge: when it matters and when it doesn't
Row gauge gets less attention than stitch gauge, and for good reason, most sock patterns specify length in inches or centimeters, not row counts.
Row gauge still matters in three places:
Heel placement. If a pattern says "work until the leg measures X inches, then start the heel," row gauge is irrelevant. If it says "work 60 rows, then start the heel," row gauge determines where the heel lands.
Gusset and heel turn shaping. Patterns that specify row counts for short rows assume a row gauge. If yours differs, the heel cup may be too shallow or too deep.
Toe length. A pattern that says "work until the foot measures 2 inches less than total foot length" is row-gauge independent. One that says "work 40 rows before the toe" is not.
If row gauge is off but stitch gauge is on, work to measurements instead of row counts. If both are off in the same direction, change needle size.
Pro TipMeasure your swatch twice: once right off the needles, and once after it has rested for an hour. If the two readings differ by more than a quarter stitch per inch, trust the rested reading. That is the fabric your finished sock will become.
Measuring after washing and blocking
Gauge changes after washing. Blocking relaxes the fibers so the fabric settles into its final dimensions: a 4-inch swatch may measure 4.25 inches after blocking, or shrink if the yarn isn't superwash.
Wash your swatch the way you plan to wash the finished socks. Most wool sock yarns are washed in cool water with a mild wool wash and laid flat to dry.
Once dry, measure again with the same center-count method.
Watch OutIf your swatch shrinks or felts after washing, do not use the pre-wash gauge. Re-swatch with a larger needle or a different washing method, or your finished socks may not fit after the first laundry day.
From Gauge to Cast-On: A Worked Example
Say your foot circumference is 8 inches and your gauge is 6 stitches per inch.
But that assumes zero negative ease, meaning the sock is exactly as wide as your foot.
Recalculate: 7.5 × 6 = 45 stitches. Round to the nearest multiple your stitch pattern requires, for a multiple of 4, round 45 to 44.
Using a Sock Stitch Count Calculator
Many knitters use online calculators to avoid math. A sock stitch count calculator takes your gauge, foot circumference, and negative ease and outputs the cast-on number automatically.
These tools are useful for double-checking math, but understanding the calculation yourself is more valuable, it lets you troubleshoot fit problems and adjust patterns with confidence.
How to Adjust Sock Pattern Stitch Count
When your gauge doesn't match the pattern
Most sock patterns assume a specific gauge. If yours is tighter or looser, the finished sock will be the wrong size.
Calculate the finished circumference the pattern creates at its gauge, then calculate the cast-on number you need to achieve that circumference at your gauge.
Example: A pattern calls for 64 stitches at 7 stitches per inch, which creates a finished circumference of 9.14 inches.
Accounting for negative ease
Negative ease is the amount you subtract from your foot measurement to make the sock fit snugly.
The amount depends on fiber, stitch pattern, and preference.
Most knitters use 0.5 to 1.5 inches of negative ease. Closer to 1.5 inches creates snugger socks that stay up well; closer to 0.5 inches creates more comfortable, less restrictive socks.
Troubleshooting Gauge Mismatch
Gauge problems fall into two categories: those caught at the swatch stage and those discovered after the sock is knit. Each has a different fix, so work through the decision tree below before ripping back or casting on again.
Step 1: Diagnose which gauge is off
Measure your swatch (or finished sock) for both stitch gauge and row gauge. Compare each to the pattern's stated gauge.
What you find
What it means
What to do
Stitch gauge too loose (fewer stitches per inch than pattern)
Your fabric is wider than intended
Go down one needle size and re-swatch
Stitch gauge too tight (more stitches per inch than pattern)
Your fabric is narrower than intended
Go up one needle size and re-swatch
Stitch gauge correct, row gauge off
Vertical fit will be off, but circumference is fine
Work to measurements instead of row counts
Both stitch and row gauge off in the same direction
Needle size is the main variable
Change needle size and re-swatch
Both off in opposite directions
Tension or yarn behavior issue
Re-swatch with attention to tension; consider a different yarn
Step 2: Decide whether to change needles or change the pattern
If stitch gauge is off by less than a quarter stitch per inch, compensate by adjusting the cast-on count instead of changing needles: multiply target circumference by actual gauge and round to the nearest multiple your stitch pattern requires.
If stitch gauge is off by more than a quarter stitch per inch, change needle size.
If stitch gauge is correct but the fabric feels wrong, too stiff, drapey, or sheer, the needle size is right but the yarn may be wrong for the pattern.
Step 3: Check for gauge drift during the project
Gauge can change between the swatch and the finished sock, and even between the first sock and the second.
Tension drift. Many knitters knit more tightly when learning a new technique (like a heel turn) and more loosely when relaxed. If your sock's leg measures correctly but the foot is too tight, tension drift is a likely cause.
Needle wear. Metal needles can develop a slight polish over time that changes how yarn slides. This rarely shifts gauge by more than a fraction of a stitch, but it can matter on a long project.
Yarn variation. Different dye lots of the same yarn can knit at slightly different gauges, especially with hand-dyed yarns. If you are knitting two socks from two skeins, swatch both.
Step 4: Fix a finished sock that doesn't fit
If the sock is already knit and the fit is wrong, you have three options:
Block aggressively. A slightly small sock may relax enough after washing and blocking to fit. This works best with wool that has natural stretch and won't fix a sock two sizes too small.
Rip back to the cuff and re-knit. If the sock is too large, rip back to the cast-on, reduce the stitch count, and re-knit. Tedious, but it preserves the yarn.
Gift or repurpose. A sock one size off may fit a different foot. A too-large sock can sometimes be felted slightly (if not superwash) to shrink it, though this is unpredictable.
For future projects, swatch at the beginning and end of your yarn to check for variation, spotting gauge changes before they affect the whole sock.
Step 5: When to accept the gauge you have
Not every mismatch needs fixing. If stitch gauge is within a quarter stitch per inch of the pattern and your foot circumference is within half an inch of the intended size, the sock will likely fit acceptably.
Fix the mismatches that affect durability or comfort: gauge so loose the fabric is thin at the heel, or so tight the sock is hard to pull on. Those are worth re-swatching and re-knitting.
Key TakeawayGauge mismatch is a diagnosis problem before it is a knitting problem. Measure stitch and row gauge separately, compare each to the pattern, and change needle size only when the stitch gauge is off by more than a quarter stitch per inch. For smaller differences, adjust the cast-on count and keep knitting.
Frequently Asked Questions
Why is gauge so important when knitting socks?
Gauge determines how many stitches and rows you knit per inch, which directly affects the finished size of your socks. If your gauge is too loose, your socks will be too large and may slip off. If your gauge is too tight, they will be uncomfortably small. Getting gauge right ensures your socks fit properly around the foot and leg, and that you use the correct amount of yarn for the pattern.
How do you measure knitting gauge in the round accurately?
Knit a swatch in stockinette stitch using your intended sock yarn and needles, working in the round if possible. After knitting at least 20 rows, place the swatch on a flat surface and use a ruler or gauge measure to count your stitches across 4 inches (or 10 centimeters). Count rows the same way vertically. Measuring in the round gives you the most accurate gauge because the fabric behaves differently than flat knitting, which is crucial for sock fit.
Should you wash and block a sock swatch before measuring gauge?
Yes. Sock yarn, especially wool, changes significantly after washing and blocking. Measure your gauge after blocking to see the true finished dimensions of your fabric. This prevents surprises when you complete your socks and wash them. Let the swatch dry completely before measuring to ensure accurate stitch and row counts.
How do you adjust a sock pattern if your gauge is off?
Calculate your stitch count using your actual gauge and the desired foot circumference, accounting for negative ease (typically 0.5 to 1 inch less than your actual foot measurement for a snug fit). If your gauge is tighter than the pattern calls for, you will need fewer cast-on stitches. If looser, you need more. Adjust the cast-on number to the nearest multiple of your stitch pattern repeat, then work the leg and foot lengths as written.



0 comentarios