What Size Inclusive Patterns Mean for Modern Knitters
Size inclusive patterns represent a fundamental shift in how designers approach garment construction. Rather than creating a single size and hoping it fits, designers now build multiple sizes into their patterns from the start, accounting for different body shapes, proportions, and measurement ranges. This approach transforms knitting from a frustrating guessing game into a craft where your finished garment actually fits your body.
Traditional patterns often resize proportionally, a method that rarely accounts for how bodies actually vary. Size inclusive patterns use grading techniques that adjust not just overall dimensions but also shaping, bust darts, and construction methods to ensure each size maintains proper fit and silhouette. A jumper that fits perfectly at one size can look awkward, baggy, or constrictive at another if the pattern hasn't been thoughtfully graded.
Key TakeawaySize inclusive patterns aren't just bigger or smaller versions of the same design. They're separately engineered to ensure fit, drape, and silhouette work across the full range of sizes offered.
How to Measure Yourself for Knitting Patterns
Accurate measurements are the foundation of finding and modifying size inclusive patterns that actually fit. Most knitting pattern failures stem not from the design but from choosing the wrong size because the knitter didn't measure correctly or didn't understand what the measurements mean.
Key measurements: bust circumference and finished garment dimensions
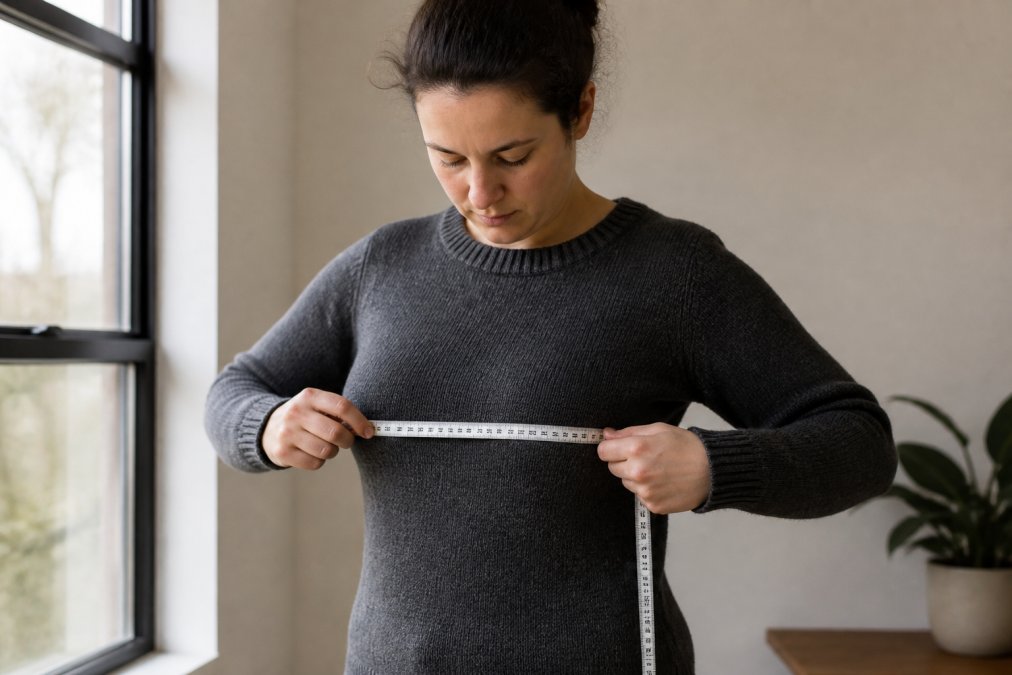
Bust circumference is the primary measurement that determines which size to knit. Measure around the fullest part of your bust, keeping the measuring tape parallel to the ground and snug but not tight. This is your body measurement, not the finished garment size.
Knitter measuring bust circumference with soft measuring tape positioned horizontally around the body, showing proper placement against the fullest part of the chest in natural daylight
Beyond bust circumference, record these measurements for reference:
Waist circumference (at your natural waist)
Hip circumference (at the fullest point)
Shoulder width (across the back from shoulder point to shoulder point)
Sleeve length (from the back of the neck, across the shoulder, down to the wrist)
Body length (from the base of your neck to where you want the garment to end)
The pattern's schematic shows finished measurements, what the garment will measure when laid flat, not what your body measures. A finished bust measurement of 100 cm with 10 cm of positive ease means the garment will measure 100 cm around, and your body measurement should be approximately 90 cm.
Understanding ease: positive ease and negative ease explained
Positive ease is the difference between your body measurement and the finished garment measurement, added intentionally for comfort and movement. A jumper with 10 cm of positive ease will measure 10 cm larger than your bust circumference. Most everyday knit garments use 5-15 cm of positive ease ([EXTERNAL_LINK: research on garment fit and comfort | pmc.ncbi.nlm.nih.gov/articles/PMC7767045/]).
Negative ease means the finished garment measures smaller than your body measurement, creating a fitted, close-to-the-body silhouette. This works well for stretchy garments like ribbed jumpers or fitted tanks, typically ranging from 2.5-7.5 cm of negative ease.
Understanding ease is critical when evaluating size inclusive patterns. A pattern offering sizes 80-130 cm with consistent ease across all sizes has been properly graded. If ease varies significantly between sizes, the garment will fit differently across the size range, defeating the purpose of size inclusivity.
Pro TipAlways check the pattern's schematic and finished measurements before casting on. Compare the finished bust measurement to your body measurement, then calculate the ease. This single step prevents most fit disasters.
Knitting Pattern Grading Explained
Pattern grading is the technical process designers use to create multiple sizes from a single design. Understanding how grading works helps you evaluate whether a pattern is truly size inclusive or just resized proportionally.
How designers create multiple sizes from one schematic
A designer starts with a base schematic, typically a medium or average size. From this, they calculate how each element needs to change to create the next size up or down. This isn't simple multiplication. A proper grading system accounts for:
Horizontal grading: How much width to add or remove (usually 2.5-5 cm per size)
Vertical grading: How sleeve length, body length, and armhole depth scale (often less than horizontal grading)
Shaping grading: How the number of increases and decreases adjust to maintain proper proportions
Ease distribution: Whether ease remains consistent or changes strategically across sizes
Many designers use a consistent grading ratio, adding 4 cm of width for each size step and 1 cm of vertical length ([EXTERNAL_LINK: garment grading techniques in fashion design | pmc.ncbi.nlm.nih.gov/articles/PMC6004510/]). This ratio stays consistent across the size range, creating garments that fit proportionally at every size.
Proportional scaling, which multiplies all dimensions by the same percentage, rarely works because bodies don't scale proportionally.
Reading a size chart: stitch counts, yardage, and finished measurements
A proper size chart for size inclusive patterns includes:
Element
Information Provided
Finished bust measurement
The garment's width when laid flat
Stitch count
Number of stitches to cast on for each size
Yardage requirements
Total yarn needed, often broken down by component
Gauge requirement
Stitches and rows per 10 cm at the specified gauge
Schematic measurements
Armhole depth, sleeve length, body length
When reading a size chart, verify that stitch counts increase proportionally with finished measurements. Irregular jumps suggest the pattern hasn't been carefully graded. Yardage should increase with size, but not always proportionally; a size 80 cm might require 1,100 metres while a size 130 cm requires 1,800 metres, reflecting the reality that larger garments need more yarn for shaping and structure.
Customizing Knitting Patterns for Fit
Even well-designed size inclusive patterns sometimes need tweaking to match your specific proportions. Learning to modify patterns confidently transforms you from a pattern follower into a knitter who can adapt any design to fit perfectly.
Lengthening or shortening garment construction
The easiest modification is adjusting length. Most patterns allow you to add or remove rows before the armhole shaping begins. Calculate how many rows you need to add or remove by multiplying your desired length change (in centimetres) by your row gauge.
For example, if your row gauge is 24 rows per 10 cm (2.4 rows per cm) and you want to add 5 cm to the body length, add 12 rows to the pattern before the armhole decreases begin. Top-down construction offers particular flexibility because you can try on the garment as you knit and stop when it reaches the desired length.
Adjusting bust darts and shaping for your silhouette
Bust darts, paired decreases and increases that shape the garment, are often the difference between a garment that drapes beautifully and one that looks shapeless. If a pattern places bust darts too high or too low for your proportions, you can shift them up or down by a few rows. If the darts feel too aggressive, reduce the number of decreases in each dart pair.
When adjusting darts, maintain symmetry on both sides of the garment.
Using short rows and top-down construction for custom fit
Short rows allow you to add depth and shaping without increasing stitch count. They're particularly useful for adjusting back neck depth, bust shaping, or waist shaping.
Top-down construction offers unmatched customization because you knit the garment from the neck down and can try it on as you progress. This lets you adjust armhole depth, sleeve length, and body length in real time. Seamless knitting simplifies modifications because you avoid the complexity of seaming adjustments.
Watch OutWhen modifying shaping, always recalculate your yardage estimate. Adding rows or adjusting dart depth changes yarn consumption.
Finding Size Inclusive Knitting Patterns
The knitting community has increasingly embraced size inclusivity, but not all patterns labelled "size inclusive" are equally well-designed. Knowing what to evaluate helps you find patterns that will actually fit.
The best size inclusive patterns come from designers who've tested their work across the full size range. Look for patterns where the designer explicitly states that they've knitted or had testers create samples at multiple sizes.
Evaluate the pattern's schematic carefully. A detailed schematic shows finished measurements, ease, and construction details for at least the smallest and largest sizes. Read pattern reviews, particularly from knitters at the size extremes. Community feedback from knitters across the size range reveals fit issues quickly.
Evaluating yarn weight, gauge swatch requirements, and technical editing
The yarn weight recommendation matters more than many knitters realise. A pattern designed for fingering weight yarn will have different stitch and row gauges than one for worsted weight, affecting how the garment drapes.
Gauge swatches are non-negotiable for size inclusive patterns. A small difference in your personal gauge, even half a stitch per 2.5 cm, compounds across a large garment. At a 22-stitch-per-10-cm gauge versus 23 stitches per 10 cm, a 100 cm finished measurement becomes 96 cm ([EXTERNAL_LINK: impact of gauge on finished garment dimensions | pmc.ncbi.nlm.nih.gov/articles/PMC12630603/]).
Well-edited patterns include clear instructions, consistent abbreviations, and accurate stitch counts. Brae & Heather curates patterns that prioritise both design quality and technical precision, ensuring your knitting experience is clear and your finished garment fits as intended.
Yarn Selection and Fiber Content for Your Size
The fibre content you choose affects not just how your finished garment feels but how it fits. Different fibres have different drape, elasticity, and weight characteristics that become more pronounced in larger garments.
Natural fibres like wool, silk, and cotton each have distinct properties. Wool offers elasticity and memory, making it forgiving for fit. Silk drapes beautifully but has minimal elasticity, so fit accuracy is critical. Cotton is sturdy and stable but lacks the give of wool, meaning a garment knitted in cotton needs slightly more positive ease to feel comfortable.
For size inclusive patterns, the yardage requirements assume a specific yarn weight and fibre. When selecting yarn for a size inclusive pattern, match the recommended yarn weight exactly and verify the fibre content aligns with your preferences. Knit a gauge swatch in your chosen yarn to confirm the stitch and row gauge match the pattern's requirements.
Pro TipLarger garments benefit from yarn with good elasticity and recovery. Merino wool and superwash wool maintain shape better than inelastic fibres, particularly important for garments where fit precision matters.
Modifying Non-Inclusive Patterns: A Technical Guide
Not every pattern you love will be size inclusive. Learning to grade a single-size pattern gives you access to a vastly larger library of designs.
Pattern grading techniques for expanding size ranges
Start by identifying the base size, typically the size the pattern was originally written for. Measure the schematic's finished bust measurement and note the stitch count.
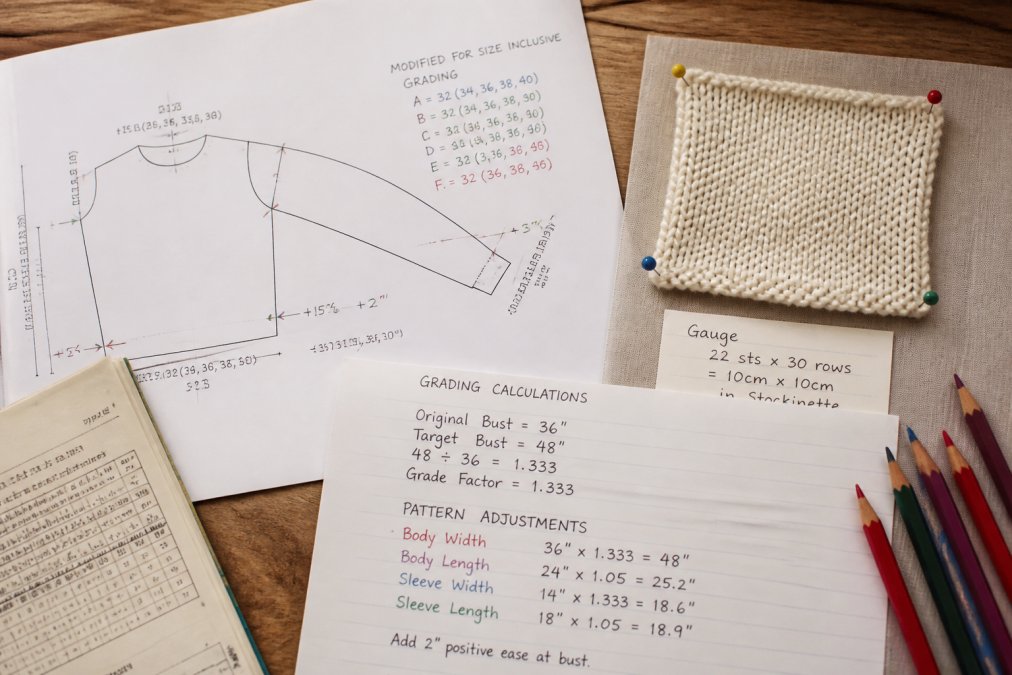
Decide on your grading increment, how much width you'll add or remove for each size step. A common increment is 4 cm of finished width per size step. Calculate the stitch count change by dividing your width change by the stitch gauge. If your gauge is 22 stitches per 10 cm (2.2 stitches per cm) and you're adding 10 cm, add approximately 22 stitches to the cast-on for the next size up.
Knitting pattern schematic with printed measurements and gauge swatch pinned beside it, handwritten notes showing grading calculations and pattern adjustments marked with coloured pencil annotations
Adjust the shaping proportionally. If the base pattern includes 8 bust darts spaced evenly across the front, maintain that spacing and distribution in the larger size. For vertical adjustments, use a smaller grading increment than horizontal. If you're adding 10 cm of width, add only 2.5-4 cm of length.
When to use seamless knitting versus seaming for larger garments
Seamless knitting, working in the round from a circular needle, simplifies grading because you avoid the complexity of seaming calculations. With seamless construction, you can adjust stitch counts at underarms without worrying about how side seams will align.
For larger garments, seamless top-down construction offers another advantage: you can try the garment on as you knit and adjust fit in real time. Seaming remains a valid choice, but it requires more planning. Calculate your seam allowances carefully, typically 1 stitch on each side of a seam line, and ensure your stitch counts accommodate this.
Finding and knitting size inclusive patterns for modern knitters transforms your relationship with this craft. When patterns fit your body without frustration, you finish projects instead of abandoning them halfway through. The technical skills, measuring accurately, understanding ease, grading patterns, become tools that let you claim every design as yours, regardless of your size. Brae & Heather's curated collection of expertly designed knitwear patterns and premium Shetland wool provides the foundation for this journey, offering patterns that honour both traditional knitting heritage and the reality of modern bodies.
Frequently Asked Questions
What defines a size inclusive knitting pattern?
A size inclusive pattern offers multiple finished measurements across a range of body sizes, typically from XS to 3XL or larger. It includes a detailed schematic showing bust circumference, length, and other key dimensions for each size, along with corresponding stitch counts and yardage requirements. True size inclusivity means the garment silhouette and construction remain consistent across sizes, not just scaled up or down proportionally.
How do I measure myself for knitting patterns accurately?
Take measurements over fitted clothing (not stretched). For bust circumference, measure around the fullest part of your chest with the tape parallel to the ground. Note your desired finished measurements (the garment dimensions you want, not your body measurements). Compare these to the pattern's schematic and size chart. Understanding positive ease (extra room for comfort) and negative ease (close fit) helps you choose the right size. Most patterns recommend 2-5cm positive ease for comfortable wear.
What is pattern grading and how does it affect fit?
Pattern grading is the process designers use to create multiple sizes from one base pattern. Rather than scaling everything proportionally, skilled grading adjusts shaping, sleeve cap depth, and armhole placement to maintain proper garment construction across sizes. This prevents the common problem of larger sizes becoming baggy or smaller sizes bunching. When a pattern is poorly graded, fit suffers even if the stitch count is mathematically correct. Good grading is what separates professional, size inclusive patterns from amateur ones.
Can I customize a knitting pattern that doesn't come in my size?
Yes, but it requires understanding garment construction. You can lengthen or shorten by adding or removing rows in the body or sleeves. For bust adjustment, you may need to modify stitch counts proportionally and adjust shaping placement. Using top-down construction or short rows gives you more flexibility for custom fit. However, modifying patterns requires basic technical knowledge, working with the schematic, recalculating yardage, and understanding how changes affect drape and silhouette. Start with simple adjustments (length) before attempting complex grading.
Where can I find reliable size inclusive knitting patterns?
Look for independent designers and publishers who explicitly test patterns across multiple sizes and document fit feedback from their knitting community. Check pattern descriptions for detailed schematics, gauge swatches, and finished measurements for each size. Read reviews from knitters who've completed the pattern in different sizes. Avoid patterns with vague sizing or limited size ranges. Many contemporary designers now prioritise inclusivity, offering 10+ sizes or custom grading options. Your local yarn shop and online knitting communities can recommend trusted designers known for thoughtful, well-tested patterns.
Does yarn weight affect how size inclusive patterns fit?
Absolutely. Yarn weight determines gauge (stitches per centimetre), which directly affects finished dimensions. A pattern designed in worsted weight may drape differently in a lighter fingering weight. Always use the yarn weight and fibre content specified in the pattern, or if substituting, ensure your yarn produces the same gauge at the same needle size. Fibre content (wool, cotton, silk blends) also influences drape and how the garment sits on your body. Natural fibres often provide better structure and recovery, particularly important for larger garments where drape matters most.
What's the difference between positive ease and negative ease in patterns?
Positive ease is extra room built into the finished measurements beyond your body measurements, typically 2-5cm for comfortable everyday wear. Negative ease means the finished garment is smaller than your body measurement, creating a close, stretchy fit (common in fitted jumpers or layering pieces). The pattern schematic should clearly show finished measurements so you can calculate which applies. Understanding ease helps you choose the right size: if a pattern has 5cm positive ease and you want a close fit, you might size down. This is why comparing your body measurements to finished measurements, not size labels, is crucial.



0 comments