Size inclusive knitting patterns go far beyond offering XS through 3XL. True size inclusivity means designing garments where every size looks intentional, fits well, and feels comfortable to wear. At Brae & Heather, the focus on inclusive design reflects a core belief: beautiful patterns should work for real bodies across the full spectrum of sizes.
Grading a pattern up or down isn't simple arithmetic. When designers scale a size 4 to a size 24 using multiplication, proportions break down. Armholes become too deep, necklines gape, and sleeve caps lose their shape. Size inclusive patterns account for how bodies actually vary, a person in a larger size may need different shaping, adjusted ease, and modified proportions throughout the garment, not just more stitches.
Key TakeawaySize inclusivity in knitting means designing garments that fit, flatter, and feel intentional across the entire size range, not simply offering more sizes with identical proportions.
How to Measure for Knitting Patterns: The Foundation
Taking accurate body measurements is the cornerstone of successful garment knitting. Without precise measurements, even beautifully designed patterns won't fit properly.
Accurate measurements require a flexible measuring tape, worn snugly but not pulled tight. The person being measured should wear minimal layers, a t-shirt is ideal, and stand naturally without flexing or holding their breath.
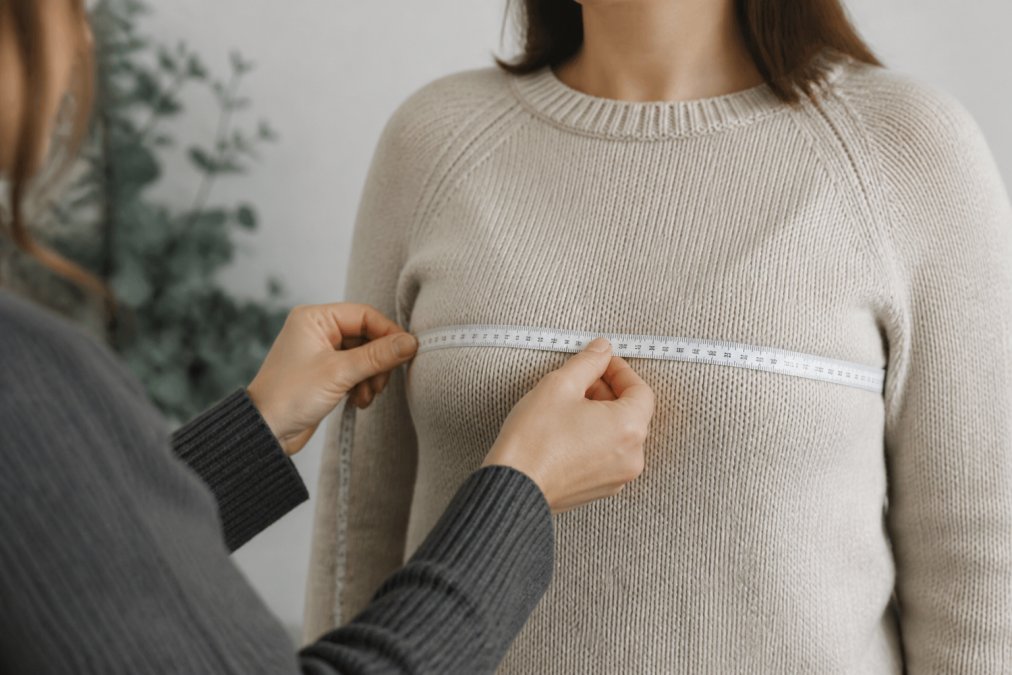
Bust circumference is the most critical measurement for garment fit. This horizontal measurement, taken around the fullest part of the bust with the tape parallel to the floor, determines which size to knit. Also record shoulder width, armhole depth, and desired finished length. Armhole depth varies significantly across body types and directly impacts comfort.
Close-up of hands measuring a person's bust circumference with a flexible tape measure positioned parallel to the floor, showing proper measurement technique with natural studio lighting
When measuring gauge swatches, measure across at least 4 inches of knitting, not 1 inch (peer-reviewed research). Block the swatch first if the pattern calls for blocking, and measure in multiple spots, gauge can vary slightly even within a single piece.
Pro TipHave the person being measured stand against a wall with arms relaxed at their sides to prevent slouching. Retake measurements if anything feels uncertain; one inaccurate measurement cascades through the entire fit.
Understanding Schematic Measurements
A schematic is a flat, two-dimensional drawing showing the finished garment's key measurements. These aren't body measurements, they're the dimensions of the completed sweater, including ease.
If a person's bust measures 38 inches and the schematic shows 40 inches for a particular size, that's 2 inches of positive ease, the comfort room built into the garment. Negative ease (garment smaller than body measurement) creates a fitted look and requires stretch fibers like merino.
Compare your body measurements to the schematic measurements, not the size number. A size 4 in one pattern might be 36 inches finished bust, while a size 4 in another could be 38 inches. The schematic is the truth.
Pay attention to length measurements too. Finished length, armhole depth, and sleeve cap height determine whether the garment will fit your proportions. A schematic showing 20 inches of armhole depth will feel different on someone with a 7-inch versus 8-inch armhole depth.
Knitting Pattern Ease Explained: Positive and Negative
Ease is the difference between body measurement and finished garment measurement.
Positive ease means the finished garment is larger than the wearer's body measurement. A person with a 36-inch bust knitting a pattern with 38 inches finished bust has 2 inches of positive ease, creating room for comfortable movement and layering. Most everyday garments include 2-4 inches of positive ease (peer-reviewed research).
Negative ease means the finished garment is smaller than the body measurement, creating a fitted silhouette. This works only with stretch fibers and is popular for fitted sweaters. Negative ease requires different fiber content and construction than positive-ease garments.
Ease also varies by section. A sweater might have 3 inches of ease at the bust but minimal ease at the waist for shaping.
Watch OutChoosing a size based on finished measurements without considering ease leads to poor fit. A knitter with a 38-inch bust choosing a "38-inch finished bust" pattern gets zero ease, the sweater will be uncomfortably tight with no room for layering. Always add 2-4 inches of positive ease for a wearable garment unless the pattern specifically calls for negative ease.
Garment Grading Techniques for Size Ranges
Creating size inclusive knitting patterns requires systematic grading, the process of scaling a pattern proportionally across multiple sizes while maintaining design integrity.
Proportional Grading vs. Straight Grading
Proportional grading scales all measurements by the same percentage. If the base size is 36 inches and the next size up needs to be 10% larger, all dimensions increase by 10%. This maintains the original design proportions across all sizes.
Proportional grading works well when body proportions remain consistent across sizes. However, bodies don't scale uniformly. Someone in a larger size often has proportionally shorter arms or different torso length relative to their bust.
Straight grading adds a fixed number of stitches or rows between sizes. If each size increases by 4 stitches across the bust, the difference between size 2 and size 4 is the same as between size 20 and size 22. This is simpler mathematically but can create odd proportions at size extremes.
The best approach combines both methods, using proportional grading for core increases, then adjusting specific measurements like armhole depth or sleeve length based on actual body data across sizes.
Calculating Stitch Count Changes
Converting bust circumference changes into stitch count changes requires understanding gauge. If a pattern's gauge is 20 stitches per 4 inches and the bust needs to increase by 2 inches, that's an additional 10 stitches.
Stitch counts must remain divisible by pattern repeats. If a cable pattern repeats every 12 stitches, the total stitch count must be a multiple of 12 plus any edge stitches. This constraint means calculated increases often need rounding.
Document all stitch count calculations clearly. A size chart showing the exact stitch count for each size at key points prevents errors and makes the pattern reproducible.
Pro TipWork backwards from the finished measurement. Multiply finished bust circumference by the gauge (stitches per inch), then subtract any edge stitches. This ensures the math aligns with actual schematic measurements rather than accumulating rounding errors.
Choosing the Right Yarn for Garment Knitting
Yarn choice directly impacts how a garment fits, feels, and wears over time. Different fibers have different elasticity, drape, and recovery properties.
Natural fibers like merino wool, alpaca, and cotton offer distinct advantages for garment knitting. Merino provides elasticity and recovery, maintaining shape through washing and wearing (peer-reviewed research). Alpaca drapes beautifully but has less elasticity, making it ideal for looser, flowing garments. Cotton offers structure and breathability but minimal stretch, requiring careful ease calculations.
Fiber content determines whether negative ease is possible. A fitted sweater with negative ease needs the elasticity of merino. Pure cotton or linen with negative ease will sag and lose shape quickly.
Yarn weight affects proportions too. A lace-weight yarn creates an entirely different visual effect and drape than a worsted-weight yarn, even in the identical stitch pattern.
For size inclusive patterns, document the exact yarn specifications: fiber content, weight, yardage, and recommended gauge. This allows knitters to make informed substitutions while maintaining the intended fiber properties.
Adjusting Existing Patterns for Better Fit
Not every knitter has access to patterns specifically designed in their size. Learning to adjust existing patterns expands the range of available designs.
Knitting for Beginners: The Unbelievable Guide to Knitting with Pictures, Instructions, and Lessons! (Knitting, How to Knit, Knitting Patterns - Paperback
Modifying Neckline and Armhole Depth
Neckline modifications address one of the most common fit issues. Measure the finished neckline circumference on the schematic and compare it to your actual neck measurement plus desired ease (typically 1-2 inches).
If the neckline is too large, pick up fewer stitches around the neck opening. If too small, pick up additional stitches. This requires recalculating the neckband shaping, but the adjustment is straightforward.
Armhole depth is equally important. Measure from the shoulder point to the underarm on your own body and compare it to the pattern schematic. If your armhole depth is 8 inches but the pattern shows 7.5 inches, you'll experience binding and restricted movement.
To deepen an armhole, work additional rows before beginning the armhole shaping. Each row adds approximately 0.1 inches to the armhole depth. Work the additional depth, then continue with the pattern's shaping instructions.
Pro TipBefore modifying a pattern, knit a gauge swatch in the actual yarn and block it according to pattern instructions. Measure your gauge swatch multiple times and in multiple locations. Gauge variations of even 0.5 stitches per inch compound across an entire garment. Accurate gauge is the foundation of successful modifications.
Lengthening or Shortening Vertical Measurements
Adjusting overall length is simpler than other modifications. The ideal place to add or remove length is between the underarm and the hem, where it doesn't affect shaping.
To lengthen, work additional rows in stockinette or pattern stitch after completing the armhole shaping and before beginning the waist shaping. To shorten, eliminate rows from this same section. Calculate how many rows you need based on your gauge.
Sleeve length adjustments follow the same principle. After completing the cap shaping, work additional rows before beginning the cuff shaping. For patterns with significant shaping, adjust length above or below the shaped sections rather than within them.
Testing Wearability and Garment Functionality
Before declaring a pattern complete, test the garment's actual wearability. Wear the finished garment for at least a few hours before washing. Does it restrict movement? Does the neckline gap when you raise your arms? Does the sleeve cap pull or bind?
After wearing, wash and dry the garment according to fiber care instructions. Does it hold its shape? Has the fit changed? Fibers like merino recover beautifully after washing, while cotton and linen may relax. This real-world testing reveals whether the pattern's ease calculations work in practice.
Document any fit issues discovered during testing. For pattern designers creating size inclusive ranges, testing across multiple sizes is essential. Real-world testing by actual knitters in each size reveals proportion issues that mathematical grading alone might miss.
Creating size inclusive knitting patterns requires combining technical precision with genuine understanding of how bodies vary. The patterns in Brae & Heather's collection reflect this commitment to inclusive design, offering garments where fit and proportions work across genuine size ranges. When knitters understand measurement principles, ease calculations, grading techniques, and fit adjustment strategies, they can confidently select patterns that work for their bodies and modify designs to achieve the fit they deserve.
Frequently Asked Questions
What defines a size inclusive knitting pattern?
A size inclusive knitting pattern offers a range of finished measurements that accommodate different body types and proportions. True inclusivity means grading patterns across multiple sizes using standardized sizing charts and clear schematic diagrams. The pattern should specify finished measurements (not just garment sizes) and explain the ease built into each size, allowing knitters to choose based on their actual body measurements rather than arbitrary sizing labels.
How do I know if a knitting pattern will fit my body measurements?
Compare your body measurements (bust circumference, armhole depth, and vertical measurements) against the pattern's schematic, not the finished size label. A pattern should include a detailed size chart showing finished measurements for each size option. Add your desired ease (typically 2-4 inches for fitted garments) to your bust measurement, then find the size with finished measurements closest to that number. Always check armhole depth and sleeve length against your proportions too.
Why is ease important in size inclusive knitting?
Ease is the difference between your body measurements and the finished garment measurements. Positive ease (garment larger than body) creates comfort and movement room; negative ease (garment smaller than body) produces a fitted, stretchy look. Size inclusive patterns specify ease for each size because different body types need different amounts of ease for the same fit quality. A pattern without clearly stated ease values cannot guarantee wearability across its size range.
Can I adjust a size inclusive pattern if it still doesn't fit perfectly?
Yes. You can modify neckline depth, armhole placement, and sleeve length by adjusting vertical measurements on the schematic. For width adjustments, recalculate your stitch count based on your gauge swatch and desired finished measurements. If changing bust circumference significantly, you may need to adjust shaping points proportionally. Always knit a gauge swatch in your chosen yarn and test fit a similar garment before committing to major modifications.




0 commentaire